


Family and friends are invited to attend a memorial service and celebration of Dick's life on Wednesday, August 19, 2009 at 2 pm at the Sutfin Funeral Chapel, 273 S. Main St., Nichols. A period of visitation and time for sharing memories will be held on Wednesday, from 1 pm until the time of the service at 2 pm. Memories and condolences may also be shared by visiting our website at www.sutfinfuneralchapel.com Friends who wish may kindly consider a memorial contribution to Stray Haven, 194 Shepard Rd., Waverly, NY 14892 in loving memory of Richard L. Lawrence.
 2009 - Year Zero. Planning the railroad, and origins of my Stonehedge Railway: (why "year zero"?
because about one actual hour of construction
was done on the garden railroad in 2009! As I type this, it is March of 2009, and no actual construction has begun on my railroad! but plans are underway, so I thought I would get a webpage up and running.. (I love making my webpages! its a hobby in itself!)  The "Stonehedge"
name comes from the rock gardens in my parents
yard. My Dad began building rock walls and ponds
in the mid 90's..very elaborate stone walls and
walkways through the shaded yard.
Before the railroad even existed, these walls and ponds were being built. One day my Mom jokingly said the garden should be called "Stone Hedge", (a play on words of the well known "Stone Henge" in England) The name stuck! and when the railroad began, it became the Stone Hedge and Shady Pines Railroad. (actually, it was
the "Lawrence & Stone Hedge" railroad
originally, but briefly.. My Dad's railroad
started in 2001, but at that time, I was still a
single guy living in I am going to call
my railroad the Stone Hedge Railway, since it
gets its inspiration from my Dads Stonehedge
& Shadypines Railroad. My Dad also drew the
Stone Hedge Logo. His original
hand-drawn logo for his railroad:
My adapted logo
for my railroad:
The first vague
ideas for the railroad began in 2007, when I
started playing around with placement and
trackplan ideas for the railroad. Deb and I also
want to build an ornamental pond, with goldfish
(and frogs), and the railroad is incorporated
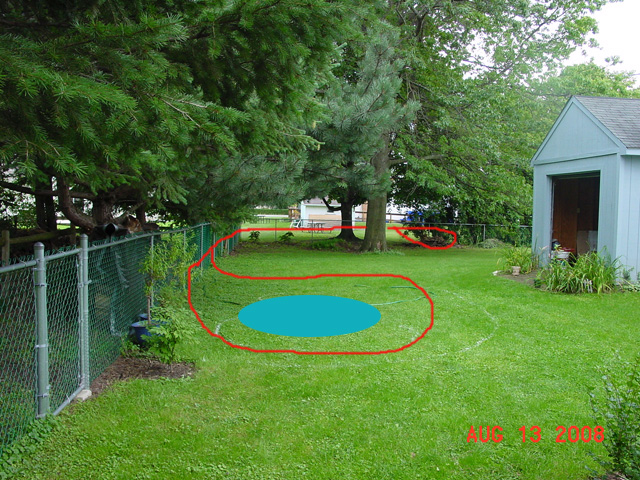
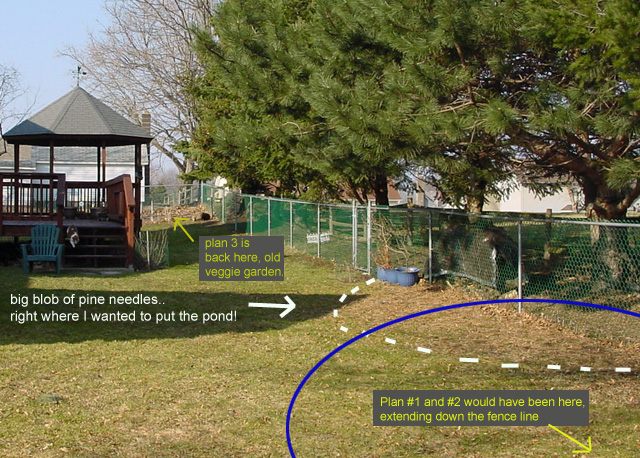
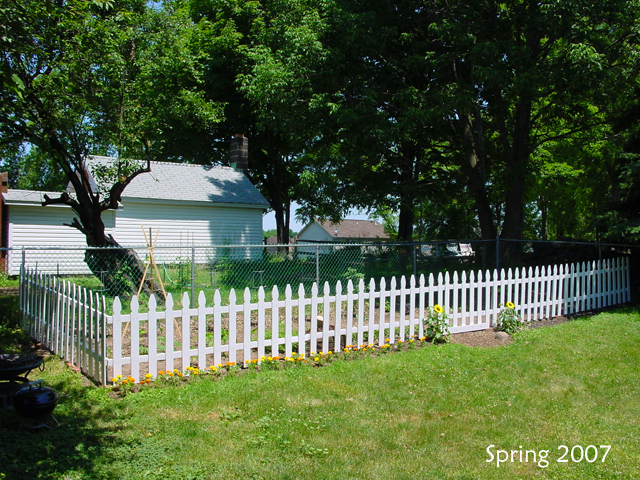
into the pond design. At first I planned to build the railroad down the fenceline in the backyard:
The big green
circle represents the canopy of the big Oak
tree.
That railroad, if
built, would have been in two sections.. one
section incorporating the pond, (the left-loop
in the diagram above) which would be the
landscaped "garden railroad" portion, complete
with plants, scenery, buildings, waterfeatures
etc..This would be incorporated inside a "block
wall" about 1-foot high, so that the entire pond
area is slightly raised above the lawn. The
track would 1-2 feet high around the pond.. The second half would be a raised "live steam" portion, (the right-loop in the diagram above) on simple timber supports. It would do a 90 degree turn in the corner of the yard, then do the second return loop by the big swingset, everything apart from the "pond portion" would be on raised timber supports..like this: Thats Chucks's old
railroad in Oswego. (click the photo to visit) The yard naturally
slopes downward slightly, so the tracks on the
"pond end" could be about 1-foot off the ground,
and down at the far end, it could be about
4-feet off the ground! (to incorporate a live
steam bay) while the track itself remains level!
perfect! This plan was the
first rough-draft..the nebulous idea through
2007.. But the following
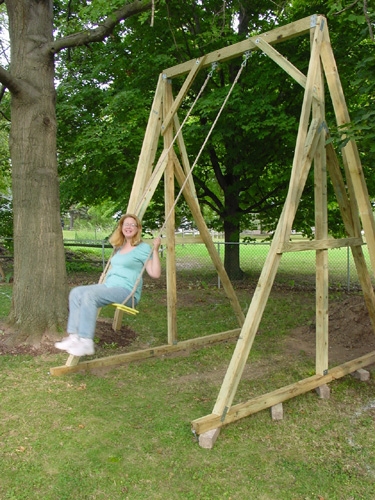
year, 2008, after planting some Hydrangeas,
which I hope will get very large and bushy, and
actually building my wife's swingset!
I scaled back the
trackplan..the big raised loop (the opposite end
from the pond) was unnecessarily large..all that
extra track and extra timber for the supports
equals lots of extra $$$..and it had to be
squeezed in fairly tightly around the
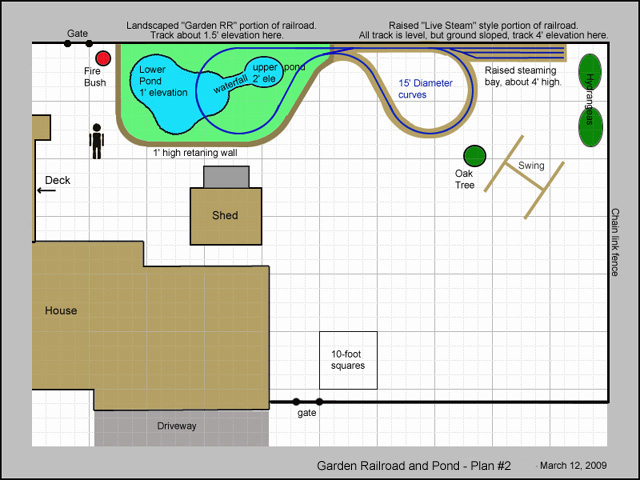
swingset..not an ideal plan.. So I drew up a new
plan..still keeping the 15' diameter loops, but
making better use of the space:
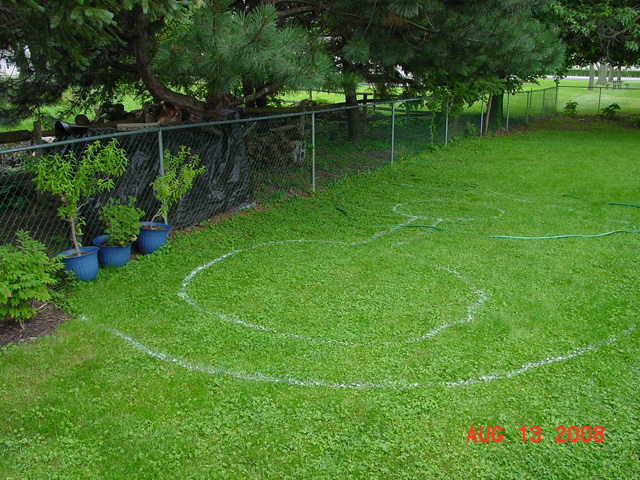
I laid out some
rough spraypaint markings last summer, just to
get a feel for the design:
The two spraypaint
ovals represent the upper and lower ponds, with
the stream connecting them, and the outer white
line represents the outer block wall. This was the
working plan through all of 2008, until March
16, 2009, when the plan changed! (changed, I
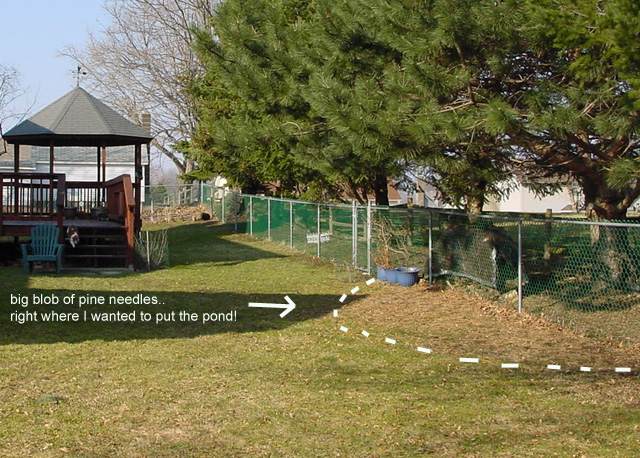
think, for the better!) Deb and I were
walking around the yard, doing an early Spring
reconnaissance of bulbs and gardens, when I
noticed that one of the trees along the fence
line drops a LOT more pine needles than the rest
of the trees..It is the LONE Red Pine in our
entire yard..and it just happens to be directly
above the future location of the pond!
(My Dad's garden
railroad is plagued by pine needles too! it must
be fate.) I pointed out the
pine needles to Deb, lamenting the irony that
placed those needles in the EXACT location I
wanted to place the pond..when Deb came up with
a new idea! "What about
putting the pond and railroad over in the
Vegetable garden"? Thats not a great spot for
the veggies anyway (not enough light)..so we
went and checked it over, and a new idea was
born!
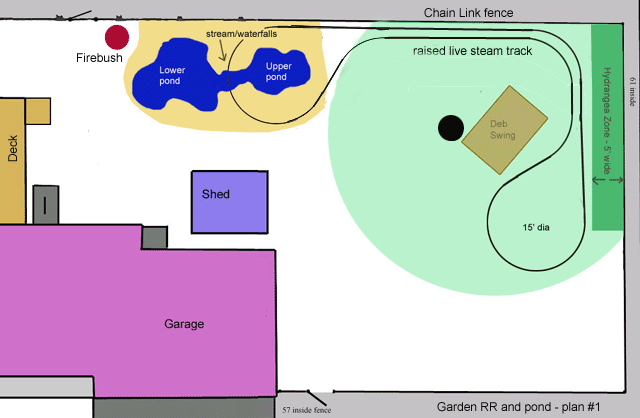
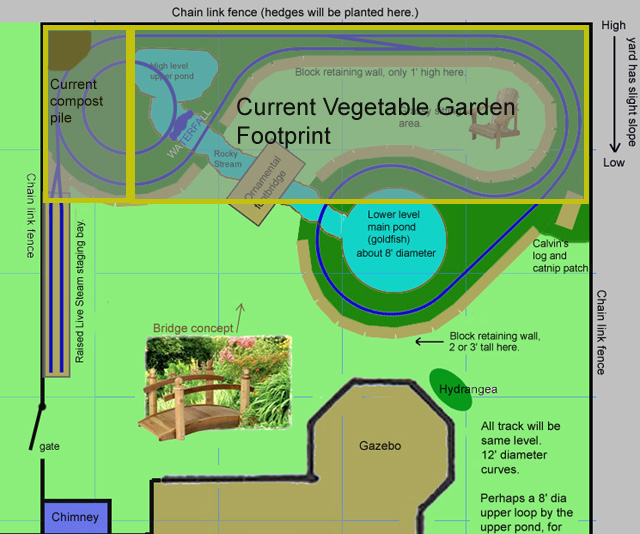
The new plan: Our vegetable
garden is on the other side of the deck from
where I had planned "version one" of the
railroad, discussed above..We only placed a
veggie garden there because it was already a
garden when we bought the house..(well..sort
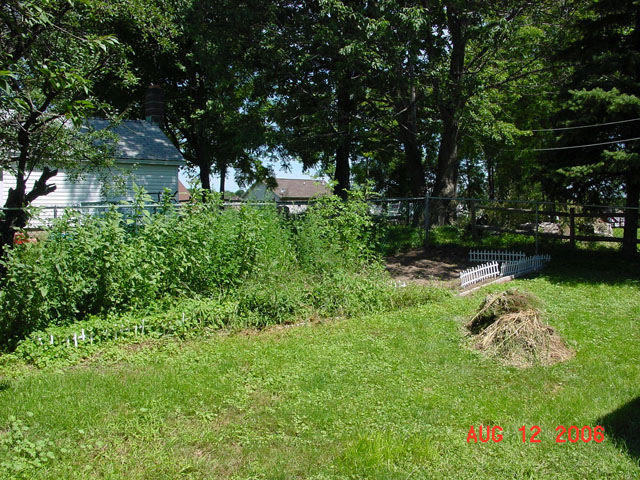
of!) When we bought the
house in Summer 2006, the previous owners had
attempted to plant a garden that spring..but I
guess because they knew they were moving, they
did no garden maintenance that entire season..By
the time we moved-in it was late Summer, and the
"garden" was one gigantic weed patch! with a few
tomatoes buried back in the weeds somewhere:
All those tall
plants are WEEDS! the pile on the grass is Deb's
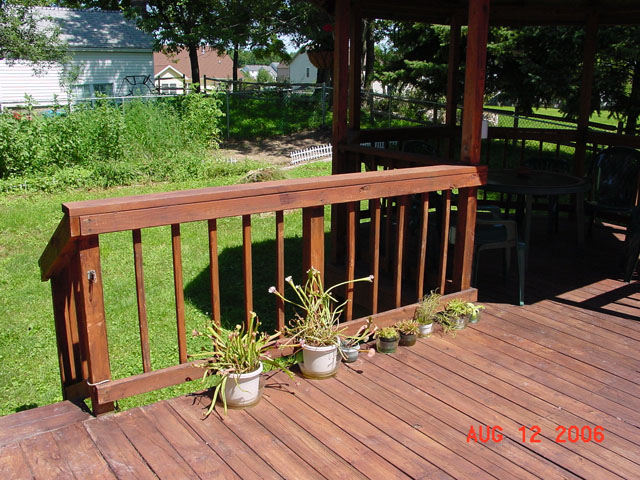
beginning attempt The view from the deck:
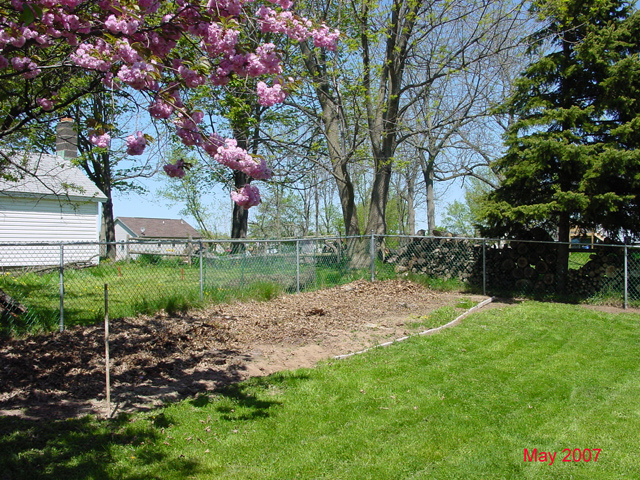
By the following
Spring, it was all cleaned out, and ready to
become
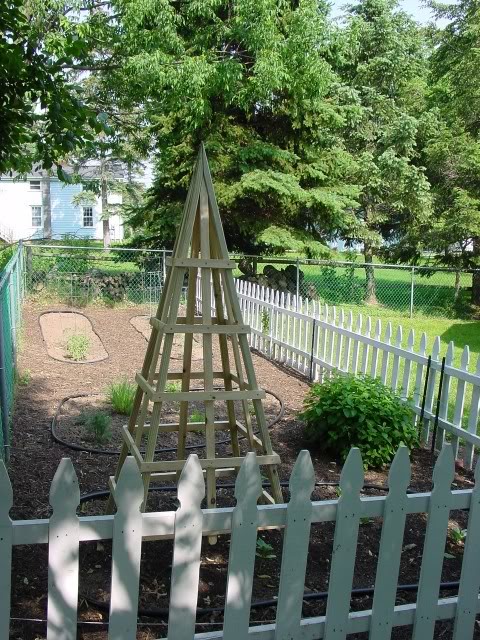
I bought some nice
wood fence, and we turned into a decent garden.
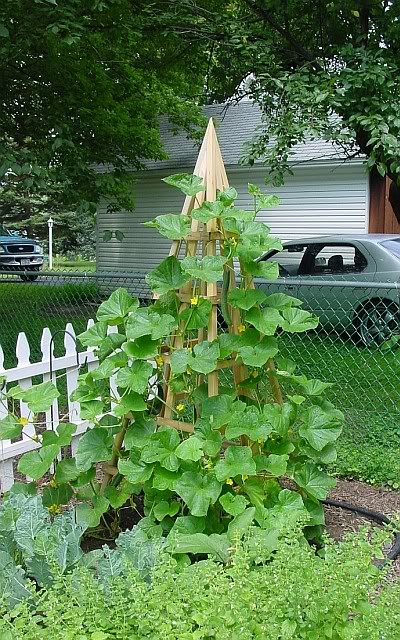
I even built a
large cucumber trellis for the garden, with help
from the guys on MLS! (thanks!
So that spot has
been an o.k. vegetable garden..We grew some nice
veggies there in 2007 and 2008..but it really
doesnt get enough light..It gets direct sun
mid-day only, (the back fence of the garden is
the north side, front of the garden is south)
but there are tall trees on both sides, east and
west sides, so the garden is in full shade all
morning and all late afternoon. We have a spot
alongside the garage, that faces south, which
gets much better light..we have been considering
moving the vegetable garden over there already. So that brings us
up to today, March 2009. Deb suggested we build
the Garden Railroad and ponds on the site of the
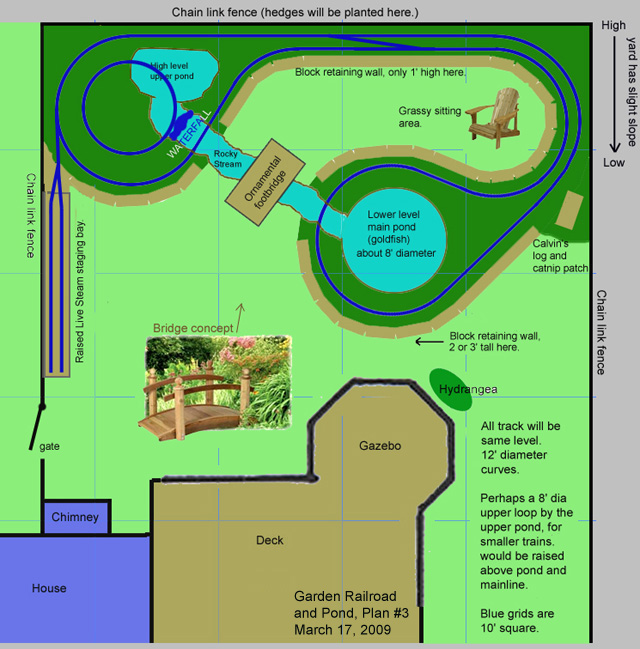
veggie garden, and I ran with the idea! New design:
(This one is
turned 90 degrees from the other diagrams.)
The only negative
to the new plan is that I had to reduce the
curves from 15-foot diameter down to 12'. But
that should still be ok for everything I want to
run. Block wall
concept, (just a random photo off the internet)
Calvin helps me
with measuring the old vegetable garden.
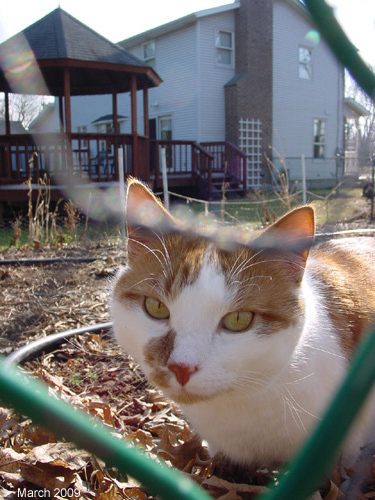
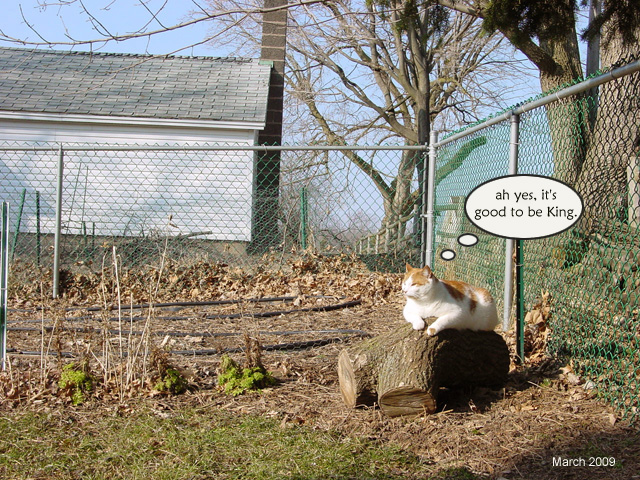
And Calvin on his
new Log perch, surveying his domain:
Thats better! it
clutters up the design a bit, but I think its
necessary to have that extra track in there.. I considered
adding a wye at the end of the Live Steam
staging bay..so trains can enter and leave the
bay in both directions..but that doesnt fit
well..but trains wont have to back into the bay,
because the crossover creates a return loop..a
live steam train could leave the bay, do its run
around the line, when its ready to return home
it simply runs through the crossover, then
returns into the bay head-first..no need to back
up. Six total
switches/turnouts on the railroad, all can be
manual-throw except for the two on the curve
outside the steaming bay, which will need to be
remote because of their location..a turnout
panel will be located at the steaming bay. Whole
railroad will likely be not track powered..I
will convert electric trains to battery power,
so live steam and electrics can run on the same
main loop, with no track cleaning required..the
small independant 8' loop around the upper pond
*will* be electric powered, so friends electric
trains (and some of my own that arent converted
to battery) have a place to run. Electricity will
be supplied to the railroad, to power the 8'
loop, the two remote turnouts, the pond pump,
and probably some night-time lighting. I delibratly moved
the upper pond off-center so that I can step
onto the railroad to access those two
electric-powered switches, in case of
derailments in that back corner. That is the
only corner of the railroad that does not have
easy access from the "ground".. Ok..a few hours
after I made plan 3b above, I changed it again!
so another change:
Thats better!
"Calvin's log and catnip patch" will have to be
moved forward, but I dont think he will mind! Here is a panoramic photo of the site:
(click on the
image to open full-size) Next step is doing
some precise measuring to see how many wall
blocks I would need, and the cost involved for
different types of retaining walls.. click here for some thoughts on
making your own blocks! something I might
consider If
things
do
actually
settle
down,
I will probably begin construction for real
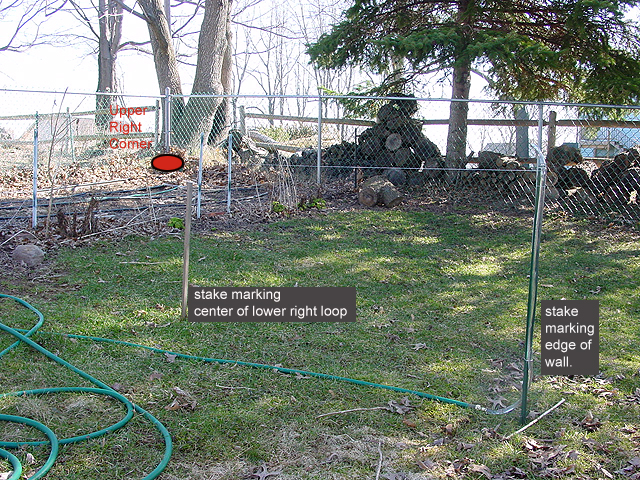
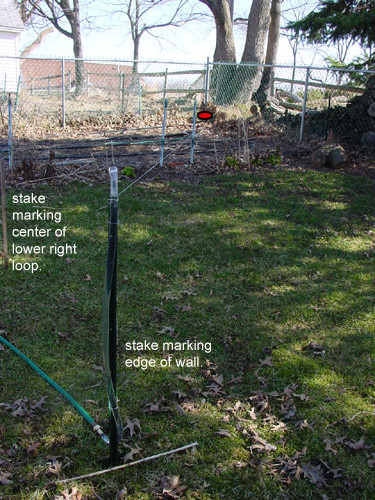
I put stakes in the ground marking the
center of both loops..
then a stake marking the lower edge of the
wall, closest to the gazebo..
I was planning to use the "upper right
corner" as the reference point (baseline) for the
elevation of the track..track about 6" above ground
in that corner, because thats the high point of the
whole area, then use that baseline level to mark out
the rest of the railroad..
well..after setting up the water level for
the first time, it turns out there is
a problem with that idea! Because that makes the wall at the far end
of the loop 38" high!!
much higher than I wanted to build..you can
see a white string in these photos, marking
a horizontal/level line from the corner to
the post:
  thats too high..too high of a wall, and
would require a ton of fill dirt..
So..minor change of plans!
instead of using the upper right
corner as the reference point, instead I am
going to use the lower edge of the wall as the
reference point...im going to make the wall
28" high, then mark out the rest of the
railroad from that point..that will require a
small cut in the upper right corner! digging
down a bit below grade..but thats ok, not
a big deal..I will dig out the "grassy seating
area" slightly so that a retaining wall can
still exist in that corner..lower the ground a
bit.
I have a few videos I plan to upload!
I will post them in a few days..
about the wall..as I said, initially
I was thinking if building a block wall...but
I think cost is going to kill that idea..the
blocks would cost about $600..while I can
build a wood wall for under $200..yes, the
wood wont last as long, but sometimes
compromises are necessary..
reading through Shad's wall thread,
there are some great photos of wood walls!
here is Bob's wall from that thread:
Bob's wall pic 1. Bob's wall pic 2. thanks Bob!
(I also saw a similar wall in front of the cat's vet office in Spencerport..im going to take some photos) I could build a wall like that!
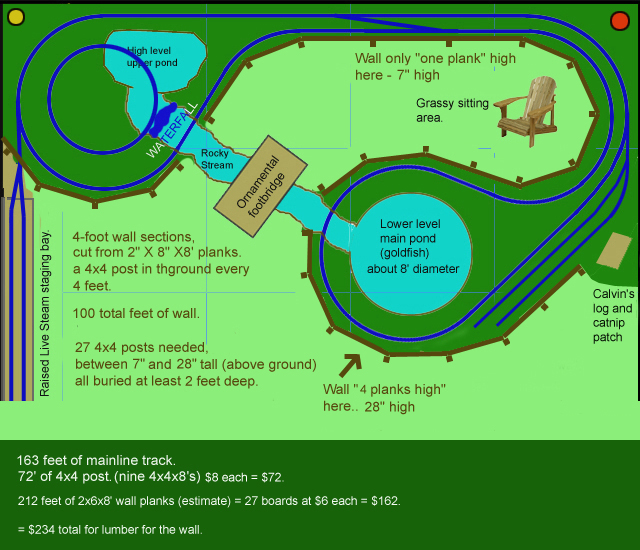
I could build a wood retaining wall, with 2X8X8's..making each plank about 7" tall..so the retaining wall for the entire railroad will be between 7" tall minimum (one plank) to 28" tall maximum (4 planks tall)..the majority of the wall will be inbetween those two extremes.. I posted some questions about this kind of wall in my Stonehedge MLS thread. New drawing, with some wood wall
ideas:
Its now mid-summer.. Even though no actual
construction is underway, the planning "in
my head" has been very active the last few
months.. Im now considering a radical
new idea..the guys over at mylargescale.com have
come up with some very interesting concepts
lately, which have been slowly creeping into
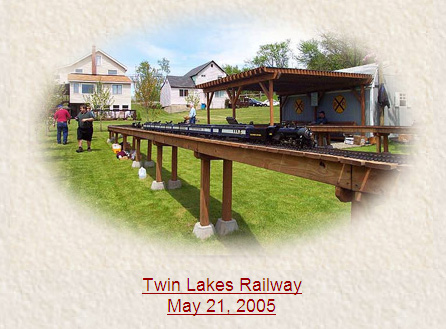
my brain, and refusing to leave.. "Raised outdoor benchwork" is quite common in the Live Steam world..again, check out Chuck's former railroad in Oswego for the concept: Twin Lakes Railway. But those kinds of railroads
are generally quite spartan, by design,
because they are meant to be "live steam
only", which is fine..but there is really no
way to "landscape" such a railroad, with
plants, groundcover and structures. Some builders have combined the
"Raised live steam track" with some sections
of "ground level" running, which can combine
both the "live steam track" and a more
traditional "garden railroad" in one
system..check out Don's Place to Run Trains
for that idea. Thats a fine idea..but only if
your landscape is suitable for it..that
works well for Don because he naturally has
that small hill to accommodate the raised
"steamup bay" section..(actually, it was
Don's hill that influenced the whole
railroad!) but such an idea doesnt fit in my
case. In my case, I want to make a
"raised garden railroad"..raised from
between 1 foot to 3 feet or so, in
different parts of the railroad..the
"traditional method" is to build a retaining
wall, out of stone, "retaining wall blocks",
wood, railroad ties, whatever..then dump in
a LOT of fill dirt to make your level area
behind the wall..then lay tracks and do your
planting/landscaping.. This "building of the retaining
wall" has really been the primary "problem"
for the early planning stages of my
railroad..what to use for the wall? and cost
is a definate factor.. Lately, a new method has
emerged..a radical idea when first
introduced, but it has been gaining ground.. Raised
Platform Garden Railroading.. Imagine your typical "indoor"
layout..the HO scale model railroad in the
basement..with wood benchwork holding
everything up off the ground. Sound strange? read on.. Richard Smith of Oregon posted
a very detailed builders log of his raised
Port Orford Coast Railroad..built on raised
benchwork! check it out: http://1stclass.mylargescale.com/stevec/POC%20RR/POC_Main.pdf Tom Bray then posted some photos of his railroad, using a similar concept: http://www.mylargescale.com/Community/Forums/tabid/56 hmmmm..could I use these
techniques for my railroad?? benefits: only major drawback I can see..
not as much opportunity for landscaping and
planting.. but in my case, with my
particular trackplan, I dont think thats a
big deal.. because much of my railroad is
"track only"..the only areas that would be
"planted" are the inside of the loops, with
the ponds..and the far corners. yes, it will require more
benchwork and lumber than the "traditional"
method..which makes it more expensive in
that area..(before, the only lumber needed
was for the retaining wall itself) but
perhaps having no need for fill dirt will
even out that extra cost for lumber..perhaps
even making the railroad cheaper overall.. so..picture this.. track is
supported on a raised roadbed.. perhaps
using deck blocks right on the ground (which
are known to be stable in this
environment..(no frost heave) or perhaps not
using the deck blocks, and just put the
posts straight in the ground.. Perhaps PVC tubing for the
upright posts (none of this will be visable
when the railroad is finished, so it can it
be ugly! Some wooden roadbed for the
track, similar to Tom's railroad here. or perhaps the
PVC spline idea..(PVC spline might not be
practical in this case..because I will need
to attach the "ground" to the track
roadbed..so it will need to be somewhat
wider than the track.) Then tie the roadbed to the
edges of the layout, using Richard's idea of
metal mesh with mulch or gravel on top,
water simply drains through..
(thats my wife's raised flower
bed..imagine the wood wall directly behind
the stone edging..I actually have a good
source for small round stones like that.. a
local farmer has a field he will let me
collect from! he wants the stones out of the
field, I want the stones! its a
"win-win"..every spring he will let me
collect a truckload for free, before he
plants.. they are literally "cobble
stones"..small rounded glacial
erratics.."cobble stone houses" were once
built with them around here...the stones
arent useful for building a wall, but they
are good for edging.) Ponds can now rest right on the
(real) ground..and build the wire mesh "railroad
ground" to meet
up with the edge of the pond. (im now
considering only one pond, not two..one pond
in the right loop, and perhaps a large
roundhouse in the upper-left loop!) The small-ish pre-formed
plastic ponds dont have to be buried..they
can simply rest on the ground, (use a bed of
sand, to protect from punctures) but you
dont have to "back fill" the sides in with
dirt..my Dad's pond has been running this
way for 10 years now, rock walls simply hide
the edge, but the rocks dont actually
support the sides of the pond: (get photo of
pond to put here) I dont have any drawings yet to
try to illustrate this "Raised Platform
Garden Railroad" idea..so im sorry if some
of it doesnt make any sense..I think im
going to build about 10 feet or so, as a
"proof of concept"..see how it looks.. Thanks to Richard, Tom and the
MLS crew for these wonderful ideas! stay tuned!
When I began this page a few
months ago, my Dad's Stonehedge & Shady
Pines Railroad was still an ongoing
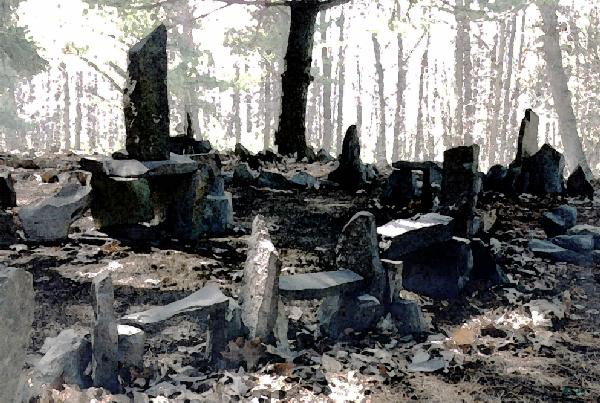
operation..that has now changed.. Eventually I plan to create a tribute to my Dad on my Genealogy page, under the Lawrence section, family group sheets. I have lots of photos, Waverly in the 1950's. his Navy days, photos from my childhood, bagpipes, all my Dad's amazing ship models and artwork..all kinds of stuff about Dear Old Dad..I will link to it here when it is done! As for his Stonehedge & Shady Pines Railroad...I knew I would someday inherit all my Dad's trains..I wish it didnt have to be so soon though.. My Dad's two trains, "The Highlander" passenger train, and the "Work Train" have been moved up to my place..They will remain forever un-altered, and will become part of my new Stonehedge roster..My Dad's railroad down in Waverly will be dismantled, track lifted, and I plan to take as much of the stone work as possible..I plan to use many of the rocks on my new railroad, and im hoping to re-build some of the "ancient ruins" on my railroad, just as my Dad built them.. 
September
13, 2009.
Ground is broken, and the first actual construction begins. As you can see from the previous page, I have had a hard time figuring out how I want to build my retaining walls! there are several different possible methods: 1. "retaining wall bricks" 2. various kinds of wood retaining walls. 3. the whole "raised platform" method..(discussed on the last page) All of them have pros and cons..none have stood out as a favorite.. My Dad's passing in August opened up a new possibility..all those Stone-hedges.. My Dad's railroad is going to be fully dismantled, my Mom is giving the ponds to Deb and I..She plans to probably move in a year or two..which means the huge collection of rocks my Dad collected over the last decade is now up for grabs.. For the next year or two, everytime I drive down to Waverly, im going to collect rocks and bring a truck load home! Eventually I can collect enough to build all my walls out of stone..re-using my Dad's stones from the his original Stonehedge & Shady Pines railroad. I like this idea on many levels..I will re-use a lot of my Dad's stone work..moving the stone walls, which were the original inspiration for the "Stone Hedge" name, from my Dad's dismantled railroad up to my new railroad..in a way, part of my Dad's railroad will live on! And! I like the looks of stone walls better than any other retaining wall method.. Im planning to create the roadbed out of brick supports and wood 2x8's for the actual roadbed..much of the "interior" of the railroad will be open..not 100% filled in with dirt. Cinder blocks will act as much of the "retaining wall"..holding in the dirt in areas where that is necessary..The exterior stone walls will end up being "decorative" walls mostly.. not fucntioning as retaining walls.. Two large areas that originally were going to require a LOT of fill dirt, namely the two large loops: 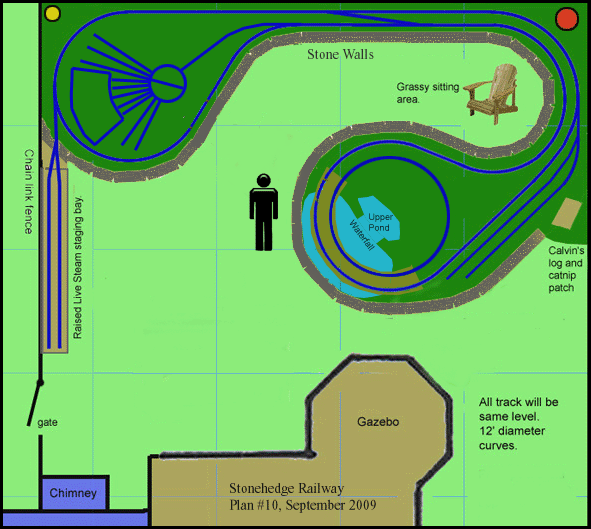 Are instead now going to require much less back fill.. the left loop is going to hold a large roundhouse and engine service area.. this large chunk of landscape will be built on a flat board using the "raised platform" method..it will be supported on wooden legs, and will be hollow underneath.. the hollow opening underneath will not be visable though, because the stone wall will "finish" the edge.. The right hand loops will also require less wall, and less fill than originally planned, because a large portion of the loop will now be a wooden trestle, which will extend down to ground level. After half a year of working out the details in my head (and on this webpage) and drawing out all my trackplans..On Sunday afternoon, September 13, 2009, on a whim really, I picked up the shovel and started digging..after awhile, Deb came out to take a few photos: 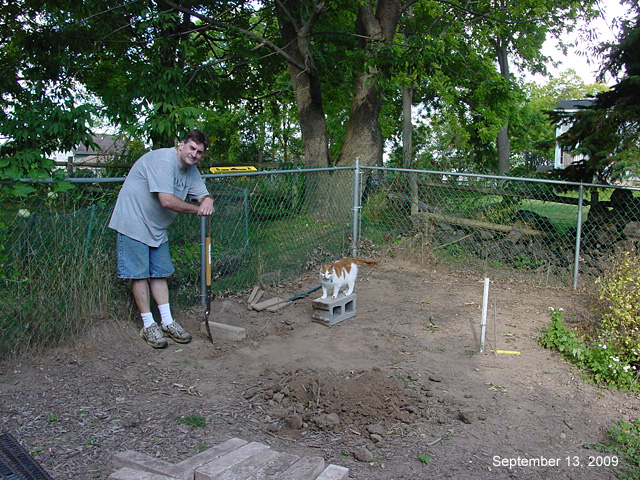 Mister Calvin and I dig out some soil to lay in the first track support. This one piece of concrete edging will set the "level" for the whole railroad. 2x8 lumber will be laid on top to form the roadbed for the track, and the area in front of this section will be dug-down about 1-foot to create the "grassy sitting area" and will be lined with stones to form a low wall. Mr. Calvin says that he would like his full title to be: "Construction Supervisor, Head Watchman, and Chief Security Officer (guarding against all dangerous trespassers, such as squirrels and birds)" and so it shall be. 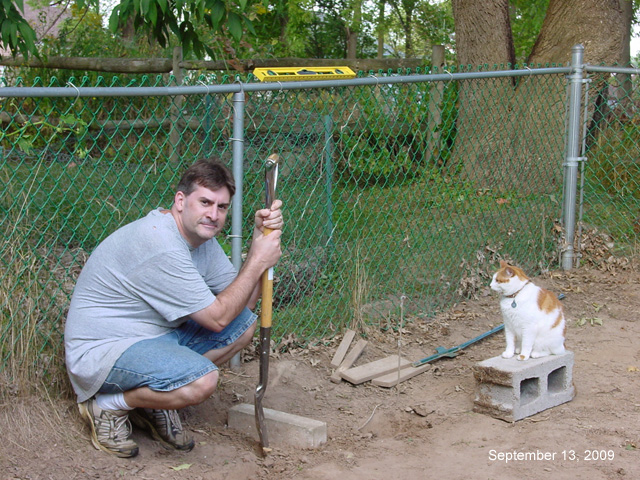 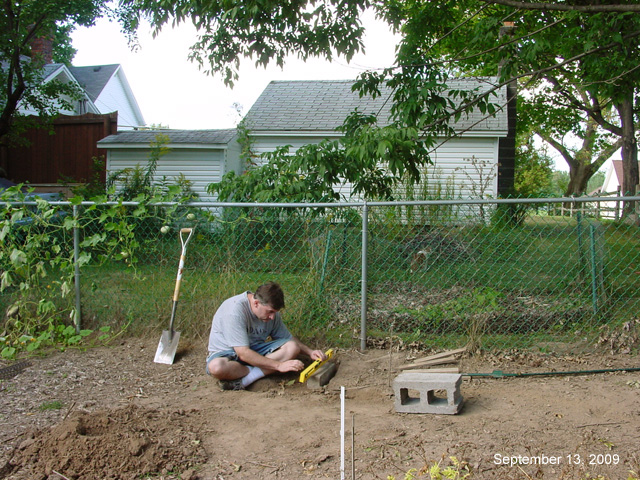 Calvin grows bored and hops the fence to do a security detail..on the lookout for mice in the neighbors garden.. 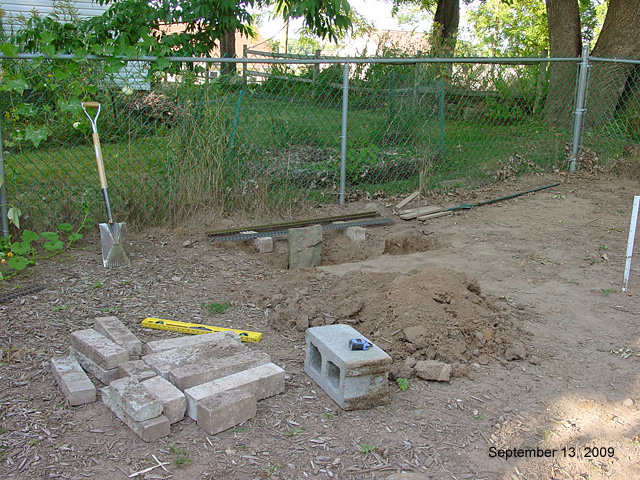 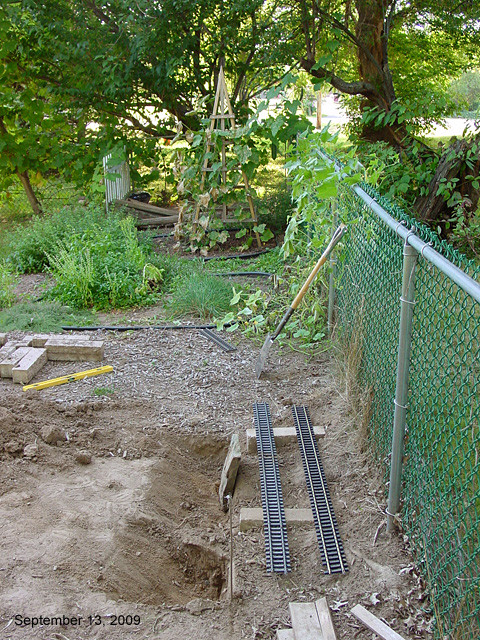 The first day's work is complete..perhaps an hour or so of earth moving... two supports are in the ground..right now they are only on tamped dirt. (I dug both slightly too deep, and had to fill back in with dirt, tamped down hard) but I think I will remove the tamped dirt, scrape down to un-disturbed soil, and fill in with gravel..tamp the gravel down tight, then replace and re-level the supports..add on the wood roadbed, then see how things hold up over the winter.
A panoramic view of the whole railroad on construction Day 1. click the thumbnail above for a full-size pic. And thats where things stand as of September 13, 2009.. Update.. that tiny bit of construction, shown above, ended up being a false-start! because it turns out (what a surprise! ;) that planning of the railroad was not yet finished! the trackplan is being changed, yet again.. continue on to the next page, 2010, for the next part of the story: |
||